WebView Workflow
One of the great things with web development is the rich set of tools you can use to improve your workflow.
An example of one of these tools is Grunt, a JavaScript task runner that allows you to simply define tasks to perform on your web app, from compiling Sass and starting a live server to compressing images, minifying JavaScript and running JSHint before creating a production-ready build.
Yeoman is a tool which helps create web applications, generating boilerplate, bringing in libraries from Bower and npm, and creating a Grunt file with predefined tasks.

In this tutorial you’ll use Yeoman to create a new basic web application, then integrate the Android Studio build system (Gradle) with Grunt, to build your web application. You’ll also set up Grunt tasks to launch a local live-reload server for testing your application in the browser, so you don’t have to manually refresh the page each time you change an HTML, CSS or JavaScript file.
Prerequisites
Before getting started, you’ll need to install a few prerequisites:
Install Yeoman: https://github.com/yeoman/yeoman/wiki/Getting-Started
Install Android Studio: http://developer.android.com/sdk/installing/studio.html
Step 1. Create a new project in Android Studio with a WebView
You can find a full instructions on how to do this in the Getting Started Guide.
Step 2. Create a subdirectory in your Android Studio project for the web app content
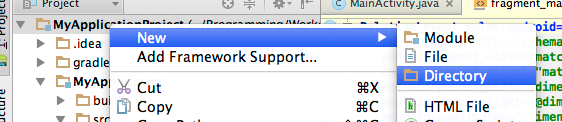
After you’ve created your project, create a new top level directory:
In Android Studio, right-click the project folder and selecting New > Directory.
Name the directory
webapp.
Step 3. Create a Yeoman project in your new directory
In a terminal cd to the the webapp directory in the project.
cd <path-to-project>/webapp/
Then create a new web app with Yeoman:
yo webapp
Follow the on-screen prompts to select project options.
You may need to run sudo npm install depending on how npm is installed on your machine.
Before proceeding to the next step, test the app by running the following command:
grunt server
A new tab should open in your browser, connecting to a local server started by Grunt.
If you change one of the HTML, CSS or JavaScript files in the project, the page automatically
reloads and updates. If you run grunt build a new directory, dist, is created and your
web app is compressed, optimised and made into a production ready version inside this folder.
Step 4. Configure the Gradle build
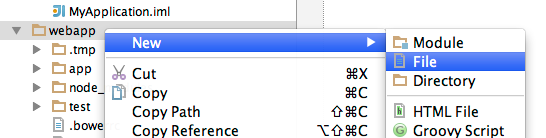
In your webapp directory create a new file called build.gradle.
In your new build.gradle file, add the following:
import org.apache.tools.ant.taskdefs.condition.Os

task buildWebApp(type: Exec) {

  executable = Os.isFamily(Os.FAMILY_WINDOWS) ? "grunt.cmd" : "grunt"

  args = ["build"]
}
This creates a new task called buildWebApp with a predefined type Exec.
You then set the executable variable in Exec to the relevant grunt
command depending on the current OS. args are set to "build" which
equates to grunt build being run on the command line. Finally, the import at the
top is to make use of Os.isFamily(Os.FAMILY_WINDOWS).
Before we can use this new task we need to make the project aware of the new
build.gradle file.
Open settings.gradle in the root directory and add the following line:
include ':webapp'Step 5. Build your WebApp when you build the android app
The final step is to get the web app to build and then copy the app into the
assets directory of our Android app.
Copy the following into the Android apps build.gradle file:
task copyWebApplication(type: Copy) {
  from '../webapp/dist'
  into 'src/main/assets/www'
}

task deleteWebApplication(type: Delete) {
  delete 'src/main/assets/www'
}

copyWebApplication.dependsOn ':webapp:buildWebApp'
copyWebApplication.dependsOn deleteWebApplication

android.applicationVariants.all { variant ->
  tasks.getByPath(":${project.name}:assemble${variant.buildType.name.capitalize()}").dependsOn copyWebApplication
}
Let’s examine each part of this.
task copyWebApplication
task copyWebApplication(type: Copy) {
  from '../webapp/dist'
  into 'src/main/assets/www'
}
This Copy task copies your application from the webapp/dist directory.
We want to copy the files to src/main/assets/www. This task
also creates the necessary file structure if any of the required directories don't exist.
task deleteWebApplication
task deleteWebApplication(type: Delete) {
  delete 'src/main/assets/www'
}
This delete task deletes all the files in the assets/www directory.
copyWebApplication.dependsOn
copyWebApplication.dependsOn ':webapp:buildWebApp'
copyWebApplication.dependsOn deleteWebApplication
The first line of this states that the copyWebApplication has a dependency on the
buildWebApp task from our web app’s build.gradle file.
The second line states there is a dependency on the deleteWebApplication task.
In other words, before we actually copy any files to the assets directory, make
sure we build the web app and also delete the current contents of the assets directory.
android.applicationVariants.all
android.applicationVariants.all { variant ->
  tasks.getByPath(":${project.name}:assemble${variant.buildType.name.capitalize()}").dependsOn copyWebApplication
}
This task specifies the dependencies for all of your project’s builds, for each version
of your app. Here it sets a dependency on the assemble tasks to run
copyWebApplication.
The assemble tasks assembles the output of the project, so the web app needs
to be copied over to the Android project first.
Step 6. Make sure everything works
In Android Studio, you should have no assets directory in your Android applications
src folder.
Don’t forget you’ll need to set the WebView to use the index.html page:
mWebView.loadUrl("file:///android_asset/www/index.html");
Note: If your page uses JavaScript, you need to enable it explicitly. For details, see the Getting Started Guide.
Now press Run and let your application build. You should see an assets directory with your web application in the
www subdirectory.
Step 7. What about live server and live reload?
So now you have a good build process for your Android application. But what about developing and debugging the web content? Live reloading can be pretty useful for making quick changes.
To enable this, you can create two "product flavors" for your app, one a live server version and one a static version, where the web content is packaged into the Android application.
In your Android app's build.gradle add the following lines in bold at the end of the
android element:
android {
...
defaultConfig {
...
}
productFlavors {
staticbuild {
packageName "com.google.chrome.myapplication"
}
liveserver {
packageName "com.google.chrome.myapplication.liveserver"
}
}
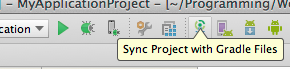
}Gradle will now offer you the ability to create a version of your app with a liveserver package name, and one with your normal package name. To check if it worked, click Sync Project with Gradle Files (on the top bar next to the Run button).
Then view the Build Variants which are in the bottom left corner of Android Studio and essentially shows you what versions of your app you can build.
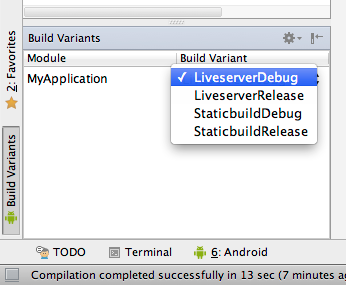
For each productFlavor there are Debug and Release versions, which the Android plugin for Gradle gives you by default. This determines whether the build should be a debug build or a release build suitable to deploy on the Play store.
Now you have two versions, but they don't actually do anything different yet.
Step 8. Load from a live server
In this step, you'll configure your application to load a different URL depending on which product flavor you build.
In your Android application, the files common to all product flavors are in src/main.
To add code or resources specific to one product flavor, you create another directory under
src with the same name as your productFlavor. When you build for that
build variant, Gradle and the Android plugin merge these additional files on top of the files in
src/main.
In this case, you'll define the URL as a string resource, and use that resource in your code instead of a hard-coded URL.
Create the folders
src/liveserverandsrc/staticbuild.
In the
liveserverfolder, create a new folder namedreswith a subfolder namedvalues. Inside this create a file namedconfig.xml. Repeat this process for thestaticbuildfolder.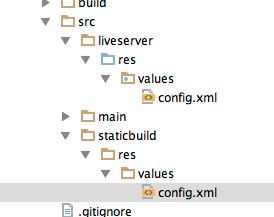
Now inside your config files add the following lines:
src/liveserver/res/values/config.xml:<?xml version="1.0" encoding="utf-8"?> <resources> <string name="init_url">http://<Your Local Machine IP Address>:9000</string> </resources>
src/staticbuild/res/values/config.xml:<?xml version="1.0" encoding="utf-8"?> <resources> <string name="init_url">file:///android_asset/www/index.html</string> </resources>
Now set your WebView to use the
init_urlfrom these config files.mWebView.loadUrl(getString(R.string.init_url));Create a new file called
AndroidManifest.xmlinliveserver/AndroidManifest.xmland add the following lines:<?xml version="1.0" encoding="utf-8"?> <manifest xmlns:android="http://schemas.android.com/apk/res/android"> <uses-permission android:name="android.permission.INTERNET" /> </manifest>
This adds the Internet permission for the
liveserverbuilds.Finally, inside
webapp/Gruntfile.jslook for:connect: { options: { port: 9000, livereload: 35729, // change this to '0.0.0.0' to access the server from outside hostname: **'localhost'** }, ... }Replace
localhostwith0.0.0.0so your local server is accessible from the local network:connect: { options: { port: 9000, livereload: 35729, // change this to '0.0.0.0' to access the server from outside hostname: ‘**0.0.0.0’** }, ... }
To test your changes:
Start the live server by running the following command:
`grunt server`In Android Studio, in the Build Variant selection, select LiveserverDebug. Then click Run.
You should be able to edit your HTML, CSS and JavaScript content and see it reflected immediately in the browser.
You now have two versions of your application: a development version with live reload from the Grunt server; and a static version, packaged locally in the Android App.