Tutorial: Getting Started
Got a web app? Follow this tutorial to add your existing web app to the Chrome Web Store.
If you don't already have a web app, you can still follow this tutorial with any other website you own. Any website can be an installable web app, although the site should follow a few design principles.
Note: If you're interested in developing a Chrome Extension or Chrome App instead of a web app, follow the extension tutorial or the Chrome App tutorial. Then return to this page, and start at Step 5: Zip up your app.
Step 1: Get ready
Before you start, choose your web app and make sure that you can verify your ownership of its site. Also, note the location of the Chrome Web Store Developer Dashboard.
-
Choose the web app that you want to publish, making a note of its homepage URL and any other URLs that it includes.
Don't have a web app? For the purposes of this tutorial, you can create a blog on Blogger and treat it like an app. Why Blogger? Because it automatically registers you as the owner of the blog's subdomain, which makes publishing your app a bit easier.
-
Make sure that you'll be able to prove ownership of the site
that hosts your web app.
(Don't worry about this if you created a Blogger blog;
you already own it.)
For information about claiming ownership,
see the Google Webmaster Tools help article
Adding
a site.
Note: You can wait to actually verify ownership until just before you publish the app.
-
Bookmark the Chrome Web Store Developer Dashboard.
Step 2: Create a manifest file
Every app needs a manifest—a
JSON-formatted file
named manifest.json
that describes the app.
-
Create a directory called
myappto contain your app's manifest.Note: You can use a different directory name, if you like. The only name that can't change is
manifest.json. -
In this new directory, create a text file named
manifest.jsonand copy the following code into it, changing the italicized text to reflect your app:{ "name": "Great App Name", "description": "Pithy description (132 characters or less, no HTML)", "version": "0.0.0.1", "manifest_version": 2, "icons": { "128": "icon_128.png" }, "app": { "urls": [ "http://mysubdomain.example.com/" ], "launch": { "web_url": "http://mysubdomain.example.com/" } } }
All new apps must specify manifest version 2 without quotes (see manifest version documentation). The remaining fields are fairly straightforward, except for "urls" and "web_url". In this example, those fields have the same values but mean different things.
- "web_url"
- Specifies the page that the browser shows when a user launches the app.
- "urls"
- Specifies the starting URLs of all other web pages
that are in the app.
In this example, both
http://mysubdomain.example.com/page1.html
and http://mysubdomain.example.com/subdir/page2.html
would be in the app.
You don't need to specify the URLs for included files
or for assets such as images.
Currently, the domain name must be followed by at least one character
("/").
Note: If your app has only one page, you can omit the "urls" field.
For more information about what the manifest for a hosted app can contain, see Hosted Apps.
Step 3: Get images
Your app needs an icon, plus at least one screenshot and one promotional image. The icon is used in the New Tab page and may also be used in the store; the screenshot is used in the store's listing for your app; the promotional image is used on the store's main page and in other places where the store presents multiple apps.
- Create or find an icon that follows the guidelines in the App icon section of Supplying Images.
-
Put the icon in the
myappdirectory, with the nameicon_128.png. - Take at least one screenshot of your app, following the guidelines in the Screenshots section of Supplying Images.
- Edit each screenshot to be 1280x800 or 640x400 pixels. Larger screenshots look better on high-resolution displays.
-
Create at least one promotional image.
It must be 440x280 and follow the guidelines in the
Promotional images section
of Supplying Images.
You can also provide 920x680 and 1400x560 promotional images.
Note: Promotional images are the main way that people will notice your app. Make them pretty and informative!
Note:
If you don't have an icon yet,
you can continue with this tutorial
by temporarily removing the following lines from
the manifest.json file:
"icons": {

          "128": "icon_128.png"

        },
Step 4: Verify that the app works
In this step, you'll load the unpacked app into the browser, so you can confirm that the app is valid.
- Bring up the extensions management page: chrome://extensions.
-
If Developer mode has a + by it, click the +.
The + changes to a -, and more buttons and information appear. -
Click the Load unpacked extension button.
A file dialog appears. -
In the file dialog, choose the
myappdirectory.
Unless you get an error dialog, you've now installed the app.Note: If you get an error dialog saying you could not load the extension, make sure your manifest file has valid JSON formatting and is called
manifest.json(notmanifest.json.txtormanifest.json.rtf, for example). You can use a JSON validator to make sure your manifest's format is valid. Often, formatting issues are related to commas (,) and quotation marks (")—either too many or not enough. For example, the last entry in the manifest should not have a comma after it. -
Create a new tab.
The icon for the newly installed app appears in Google Chrome's launcher on the New Tab page. If the Apps area is minimized, then instead of the icon you specified, you should see the website favicon. -
Click the icon for the app.
You've now launched the app. You should see its website in your browser window. If you don't, try changing the value of "web_url" in the manifest, reload the app, and click its icon again.
Step 5: Zip up your app
Create a ZIP archive of
the directory that contains manifest.json and the icon.
On Windows,
you can do this by
right-clicking myapp
and choosing the menu item Send to > Compressed (zipped) folder.
On Mac OS X,
control-click myapp
and choose Compress "myapp".
If you like to use the command line, you might enter this:
zip -r myapp.zip myapp
Note: If your app is an extension or a packaged app that uses Native Client, you can structure your application directory hierarchy and ZIP file in a way that reduces the size of the user download package. For details, see Reducing the size of the user download package.
Step 6: Upload your app
In this step, you upload the ZIP file that you created in Step 5.
- Decide which Google Account is your developer account—the
account that you'll use to
verify ownership and publish your app.
Instead of using your personal Gmail account,
you might want to create a dedicated account
for your apps.
For details, see
Choose a developer account
in Publishing Your App.
Note: If you created a blog, choose the account that you used to create that blog.
- Go to the Chrome Web Store Developer Dashboard,
and sign into your developer account.
If you don't have a developer account, then when you try and access the dashboard you'll be asked to register as a Chrome Web Store developer now and pay a one-time fee. If you already have a developer account, but have never paid the one-time fee, you'll see the same retistration page and will need to pay the one-time fee now.
Once you sign in, you'll see a list of any installable web apps, extensions, and themes that you've already uploaded.
- Click the Add new item button in the dashboard.
If you've never uploaded an installable web app, extension, or theme before, you need to accept the developer agreement before going on. - Click Choose file,
choose the ZIP file you created in Step 5,
and click Upload.
If you see an error message, fix the error, zip up the directory again, and upload the ZIP file.
Within seconds you should see the Edit page for your app. At the top, you might see a warning that you must verify ownership for whatever sites you specified in the "urls" and "web_url" fields. That warning has a link that takes you to Google Webmaster Tools, where you can verify ownership at any time before you publish the app.
Step 7: Fill out the form, and upload images
In this step, you use the dashboard's Edit page to provide information for the store's listing of your app.
- In the Detailed description section, enter text that describes your app.
- In the Icon section, upload the same 128x128 icon that you put into the ZIP file.
- In the Screenshots section, upload at least one screenshot of the app (1280x800 or 640x400). Four or five would be better.
- In the Promotional images section, upload your promotional images (you must upload at least the 440x280 image).
- Under the Verified website section, select the website for which the app is an "official item". The drop-down lists only the domains for which you're the verified owner.
- In the Categories section, select at least one category for your app. For more information, see Choose your app's category well in Best Practices.
- If you want to charge for your app, specify the price and the payment system in the Pricing and Payments section. You can use the built-in Chrome Web Store Payments system if you are in a supported region. For more information about payment options, see Monetizing Your App.
- At the bottom of the edit page, click Save draft and return to dashboard.
Note: If you are already hosting your app in Google Play, and you want your Chrome Web Store app listing to show an “Available for Android” link, your app must have the same name as your Google Play listing and both apps must be owned by the same developer account. To have your CWS item transferred to a different developer account, you must submit this form.
Step 8: Preview and improve your app's listing
Now you get to see what your app's listing in the store will look like.
- In the dashboard, click your app's "Edit" link to return to its Edit page.
-
At the bottom of the Edit page,
click Preview changes.
You should see a page that looks something like this:
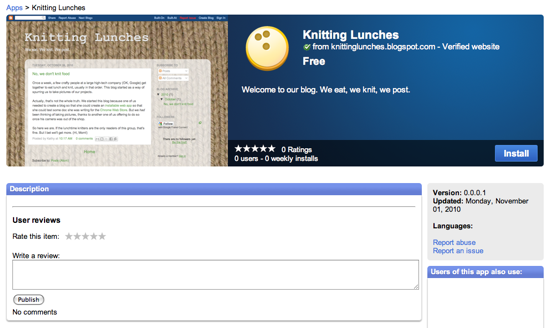
Note: If you haven't provided a screenshot yet, your page will have a big blank space at the upper left.
- Make sure that the images and text look good and that any links you provide are valid. If you refer to Google brands, follow the Branding Guidelines.
- At the top of the page, click the "Edit" link to return to the Edit page.
- After making any improvements you'd like, click Save draft and return to dashboard.
Note: Before finalizing your app's listing, think about how users are going to find your app, and make sure the detailed description includes the terms they're likely to search for. Check out listings for similar apps to get ideas for how you should present your app.
Step 9: Test, deploy, publish, improve, repeat
- Test your app to make sure its users will have a good experience with it. If your app uses features such as geolocation or notifications that require user consent, consider adding a permissions field to the manifest.
- If you don't already have a support site, create one. Providing a link to a support site in your app's listing gives users an alternative to using the User reviews section as a way of reporting issues.
- Once your app and the sites it depends on are ready, deploy the app to the web (if it isn't already public).
-
In the Chrome Web Store Developer Dashboard,
click the "Publish" link
to publish your app's listing
in the Chrome Web Store.
When you publish your app, its listing becomes visible to you and to anyone who has access to the Chrome Web Store. People can buy your app (if you charge) and install it. When they install your app, they download a
.crxfile that contains everything you uploaded in the ZIP file. -
After you publish your app,
whenever you want to change
your app's listing or
.crxfile, use the dashboard to update them. To push an updated.crxfile for your app, just increment the version number in the manifest, upload a new ZIP file to the dashboard, and publish the change. People who have already installed your app will automatically get the update.
What next?
Here are some choices for where to go next:
- Overview
- Get the conceptual background you need to use the Chrome Web Store well.
- Checking for Payment
- Learn how to use the Licensing API to check whether the user has paid for your app.
- Samples
- Find samples in multiple languages of hosted apps that use the Licensing API.
- Tutorial: Licensing API
- Walk through a full example of creating an app that uses the Licensing API to check whether the user has paid.
If you just want to write your app, see the developer doc for the type of app you're interested in: