Important: Chrome will be removing support for Chrome Apps on Windows, Mac, and Linux. Chrome OS will continue to support Chrome Apps. Additionally, Chrome and the Web Store will continue to support extensions on all platforms. Read the announcement and learn more about migrating your app.
Overview
The Chrome Web Store lets you publish apps where Google Chrome users can easily find them. The store's primary purpose is to help Chrome users find apps. It does this by supporting search, by providing browsable categories of apps, and by displaying lists of various kinds, both curated and autogenerated. User ratings and reviews are used to rank apps.
Item concepts
With the Chrome Web Store, you can publish three kinds of items:
- Apps
-
Contains installable web apps. An installable web app can be a normal website with a bit of extra metadata; this type of app is called a hosted app. Alternatively, an installable web app can bundle all its content into an archive that users download when they install the app; this is a packaged app. Both hosted and packaged apps have icons in Chrome's New Tab page, and most users shouldn't be able to tell the difference between them without looking at the address bar.
Before publishing a hosted app in the store, you must verify that you own the website that hosts the app's content. Packaged apps might have some association with a website, but you have the option of designing them so that they don't rely on the web at all.
- Themes
- Contains themes for Chrome, which change the way the browser looks.
- Extensions
-
Contains extensions for Chrome,
which change how the browser behaves
and, in a limited way, how it looks.
If your extension seems more like a website than a small browser add-on, consider making it a packaged app. Packaged apps are implemented as extensions that have the additional ability to present an app-like interface.
Terminology note: When this documentation talks about an app without giving any other details, it means any of the above—an installable web app, a theme, or an extension.
Every app has a manifest, and most likely icons,
that you put into a ZIP file and upload to the
Chrome Web Store Developer Dashboard.
The Chrome Web Store takes the contents of this ZIP file
and puts them in a cryptographically signed .crx file.
Users download this .crx file
when they click the Install button for your app.
To create installable web apps and extensions, you should be familiar with HTML, JavaScript, and CSS. If you're targeting Chrome exclusively, you can depend on HTML5 and the other emerging APIs that Chrome supports.
For detailed information on creating apps, see the developer doc for the type of app you're interested in:
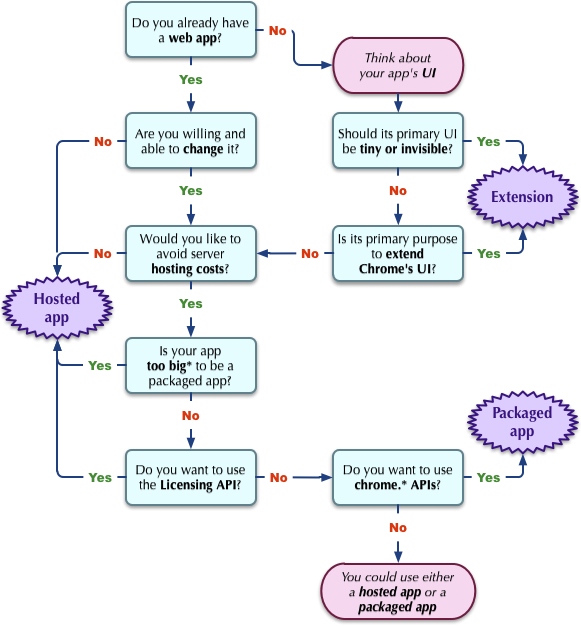
If you aren't sure what kind of app you need to write, see Choosing an App Type.
Charging for your app
The Chrome Web Store has a built-in payment system called Chrome Web Store Payments that you can use if it meets your needs. Alternatively, you can either provide your item for free or use your own payment system to charge for the item. Whether or not you charge for your item, you have the option of selling virtual goods within your web store item, such as by using the In-App Payments with Payments Merchant Account and the Chrome Web Store API.
For each item you publish, you can choose from any of the following payment options:
- Free
- One-time payment with the Chrome Web Store Payments
- Monthly or yearly subscription with Chrome Web Store Payments
- Free trial with b or c
- Custom payment solution
Note: Although packaged apps and extensions can use Chrome Web Store Payments, it's difficult for them to use the Licensing API securely. Themes have no executable code, so they can't use the Licensing API.
Providing some functionality for free
A freshly installed app should always provide something useful or interesting, even if the user hasn't paid yet. If the first page the user sees is useless—nothing but a payment wall, for example—the user is likely to uninstall your app, and you might get some scathing reviews.
If you list your app as free, then it should perform its function without asking for payment from the user. See the policy document for details.
If you charge for your item, we encourage you to provide a free trial version with an upgrade path to the paid version. This model is sometimes called freemium. Another way to implement a freemium item is to make the item free and to charge for additional features using in-app payments.
A free trial of an item should provide a basic level of functionality that lets the user gauge the usefulness of the item. Examples:
- Games: a few game levels
- Productivity apps: a limited but still useful set of features
- Content apps: a subset of available content
Using the built-in system: Chrome Web Store Payments
To use Chrome Web Store Payments, you must open a Payments Merchant Account, and you must associate that account with the store. For details, see Sign Up for your Google Payments Merchant Center Account.
When someone buys your app using Chrome Web Store Payments, Google charges you a 5% fee per transaction. For example, if you charge $1.99, you'll receive $1.89. You must choose a price for each location where you sell your app; for the US, the minimum price is $1.99. See Payments: Regions, Fees, and Tiers for details.
Note: In-app payments for ARC apps are subject to a 30% transaction fee. For example, if you charge $1.99 for an item offered in an ARC app, you’ll receive $1.39. This is to ensure a consistent pricing structure with in-app payments made in apps available on Google Play. ARC does not currently support other purchase models including up-front payments, subscriptions and in-app version upgrades; as these types of purchases require provisioning from Google Play which is not currently enabled. For more information on monetizing ARC apps, see In-app purchases for ARC apps.
Chrome Web Store Payments works for buyers and sellers in many supported {# seller#} regions. As long as you're in a supported region you can signup as a merchant, specify regions where the app should be listed, and publish your item to the world.
Note: Chrome Web Store payment methods are not available for hosted apps.
Uploading and publishing your item
To publish items to the Chrome Web Store, you first use the Chrome Web Store Developer Dashboard to upload your app and specify how its listing should look. Then you can publish it either to the world at large or to a few trusted testers. For details, see Publishing Your App.
Note: Before you can use the Chrome Web Store Developer Dashboard, you must pay a one-time $5 developer registration fee. If you have previously paid this fee in order to publish an extension, you do not need to pay it again.
Protecting your item from unauthorized use
The Chrome browser provides a minimal default level of protection
when a user tries to install an item.
This protection relies on the fact
that .crx files created by the Chrome Web Store
are signed and contain an autoupdate URL created by the store.
Here's how the protection works:
If the user downloads
a .crx file
that was created by the store,
then the app installs only
if the .crx file is
being served by the Chrome Web Store.
Using the Licensing API to check for payment
The Chrome Web Store Licensing API lets you find out whether the current user has paid for your item using Chrome Web Store Payments. To use the Licensing API, you need two IDs and an OAuth access token:
- App ID
- The Chrome Web Store Developer Dashboard generates this ID the first time you upload the app. You can get it from the Developer Dashboard's page for your item.
- User ID
- Your app needs to get a Google Account identity for the user, using OpenID.
- OAuth access token
- After you upload your app, you can ask the Chrome Web Store Developer Dashboard to generate an OAuth access token and secret.
Once you have these items, you can make requests to the license server using OAuth and the Licensing API. The license server tells you whether the user has access to this item, and whether a free trial is in effect. Rather than query the server repeatedly, you should cache the response.
For detailed instructions on using the Licensing API, see Checking for Payment.
Encouraging payment
No protection is perfect, but here are some practices that should encourage people to pay for your item:
- Update your app frequently, so that only authorized users will always have the latest, greatest version of the item. Distributing updates is easy, thanks to Chrome's support for autoupdate. You just increment the version number in the manifest, update the ZIP file, and then use the Chrome Web Store Developer Dashboard to upload and publish the updated ZIP file. Over the next few hours, the new version of the item starts going out to its existing users.
- Don't put any roadblocks in front of users. Your item should be easy to buy, and it should work everywhere users want it to work.
What next?
Here are some choices for where to go next:
- Tutorial: Getting Started
- Publish your first item in the Chrome Web Store.
- Checking for Payment
- Learn how to use the Licensing API to check whether the user has paid for your item.
- Tutorial: Licensing API
- Write an app that uses the Licensing API.
- Samples
- Find samples in multiple languages of apps that use the Licensing API.
If you just want to write your item, see the developer doc for the type of app you're interested in: