Internationalizing Your App
Unless your app is strictly local in scope, you should internationalize it, making it easy to adapt to various languages and regions. You can then localize it—translate and otherwise adapt it so that it works well in a particular locale.
You can internationalize your app even if it initially supports just one locale. For example, you might initially publish your app in English (locale code: "en"). Then, after a few weeks or months, you might add support for additional locales such as French (locale code: "fr") and Arabic (locale code: "ar").
Note: The word internationalization is often abbreviated to i18n, referring to the 18 letters between the letters i and n. Localization is sometimes abbreviated to l10n.
Overview
Here are the steps you need to follow when you internationalize and localize an app to be published in the Chrome Web Store:
- Decide which locales you want to support.
- Internationalize and localize the app's UI.
- Localize your app's name and description.
- Upload your app using the Chrome Developer Dashboard.
- Edit your listing, providing localized versions of the detailed description and screenshots.
- Specify which regions you want to support.
How you accomplish step 2 depends on whether you're writing an extension, packaged app, or hosted app. Extensions and packaged apps can use the extension system i18n support to provide the appropriate UI strings for each locale. Hosted apps don't have access to the extension i18n support for their main UIs, but they can use whatever other i18n techniques and libraries suit the app.
In step 3 you localize the name and description by editing the manifest file and providing strings for your chosen locales. Once you've uploaded your app (step 4), you can finish your app's listing (step 5).
If you provide strings for at least two locales in step 3, then you'll be able to provide locale-specific information in step 5. Otherwise, your listing will be the same in all locales.
Note: You can significantly increase your app's ranking in the locales that you support by localizing the name, description, and detailed description.
Choosing locales to support
You can localize your app to any of the following locales.
| Locale code | Language (region) |
|---|---|
| ar | Arabic |
| am | Amharic |
| bg | Bulgarian |
| bn | Bengali |
| ca | Catalan |
| cs | Czech |
| da | Danish |
| de | German |
| el | Greek |
| en | English |
| en_GB | English (Great Britain) |
| en_US | English (USA) |
| es | Spanish |
| es_419 | Spanish (Latin America and Caribbean) |
| et | Estonian |
| fa | Persian |
| fi | Finnish |
| fil | Filipino |
| fr | French |
| gu | Gujarati |
| he | Hebrew |
| hi | Hindi |
| hr | Croatian |
| hu | Hungarian |
| id | Indonesian |
| it | Italian |
| ja | Japanese |
| kn | Kannada |
| ko | Korean |
| lt | Lithuanian |
| lv | Latvian |
| ml | Malayalam |
| mr | Marathi |
| ms | Malay |
| nl | Dutch |
| no | Norwegian |
| pl | Polish |
| pt_BR | Portuguese (Brazil) |
| pt_PT | Portuguese (Portugal) |
| ro | Romanian |
| ru | Russian |
| sk | Slovak |
| sl | Slovenian |
| sr | Serbian |
| sv | Swedish |
| sw | Swahili |
| ta | Tamil |
| te | Telugu |
| th | Thai |
| tr | Turkish |
| uk | Ukrainian |
| vi | Vietnamese |
| zh_CN | Chinese (China) |
| zh_TW | Chinese (Taiwan) |
Localizing your app listing
To localize your app's listing, you first localize the name and description. Then, after uploading your localized app, you can edit your app's listing to specify localized versions of your app's detailed description and screenshots.
Name and description
You localize the name and description
by modifying manifest.json and
providing a _locales directory
in your app's ZIP file.
Specifically,
you need to:
- Modify the "name" and "description" manifest fields
- Add a "default_locale" field
- Provide at least one
_locales/locale/messages.jsonfile, wherelocaleis a locale code; eachmessages.jsonfile contains the strings for one locale
Here's an example of how you might specify the name and description of an internationalized hosted app that has English as its default language and British English as its secondary language:
//in manifest.json:
  "name": "__MSG_appName__",
  "description": "__MSG_appDesc__",
  "default_locale": "en",

//in _locales/en/messages.json:
{
  "appName": {
    "message": "My App",
    "description": "The title of the application, displayed in the web store."
  },
  "appDesc": {
    "message": "This app does something awesome.",
    "description":"The description of the application, displayed in the web store."
  }
}

//in _locales/en_GB/messages.json:
{
  "appName": {
    "message": "My Application"
  },
  "appDesc": {
    "message": "This application does something brilliant."
  }
}
If you add a locale later,
you just need to add a
_locales/locale/messages.json file
for that new locale.
For example, if you add support for French and Arabic,
you'll need to add two files:
_locales/fr/messages.json and
_locales/ar/messages.json.
Each of those files can be a copy of _locales/en_GB/messages.json,
but with translated versions of the "message" values.
For more details, see the following examples and documentation.
- Example: Minimal Localized Hosted App
- Examples: Extensions that use i18n APIs
- Extensions documentation: Internationalization
- The How extensions find strings section shows how you can sometimes omit message strings. For example, if the app's name isn't translated, you can leave it out for non-default locales.
- The How to set your browser's locale section is helpful when you test your translations.
Once you've completed this step, upload your app using the Developer Dashboard, as described in Publishing Your App.
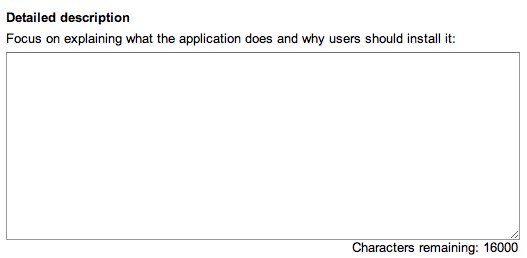
Detailed description
For each locale your app supports, edit your app's listing to provide a detailed description of your app.
First, get to your app's Edit page,
which you can do by going to the dashboard
and clicking the "Edit" link for the app.
As the following figure shows,
if you support multiple locales
a pull-down list appears at the top of your app's Edit page.
Each item in the list corresponds to one of the
_locales/locale directories that you uploaded.

Next, choose the locale that you want to edit. (Skip this if your app supports only one locale.)
Now edit the detailed description, providing text for the currently selected locale (or for the default locale, if you support just one).
If you support multiple locales, repeat the previous two steps until you've provided a detailed description for each supported locale.
Screenshots
As the screenshot guidelines say, you should provide screenshots for your app. You can tailor these screenshots for each locale.
To add a screenshot, click the Choose File button in the Screenshots section of the Edit page.
If your app supports multiple locales, then after you upload each screenshot, you can specify whether it's for all locales or just for the one you're currently editing.
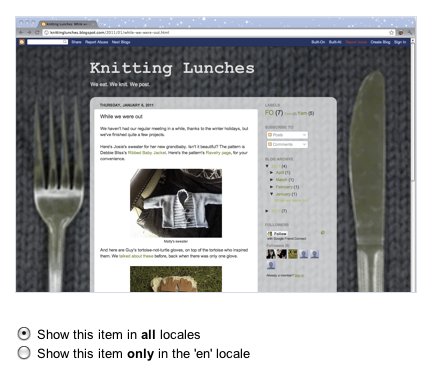
To change the locale information for a screenshot, first use the pull-down list at the top of the page to choose the locale where you want the screenshot to appear. (If you don't see the screenshot, go to the locale that it's restricted to and click "Show this item in all locales".) Click the thumbnail for the screenshot, so that it's displayed at full size above the thumbnails. Now you can change the locale for the screenshot.
Specifying where to publish your app
By default, your app is listed in all regions that can use the Chrome Web Store. If you don't want your app to be listed in a particular region, unselect that region from the following list in the Regions section of the Edit page.
- Argentina
- Australia
- Austria
- Belgium
- Brazil
- Canada
- China
- Czech Republic
- Denmark
- Finland
- France
- Germany
- Hong Kong
- India
- Indonesia
- Israel
- Italy
- Japan
- Mexico
- Netherlands
- New Zealand
- Norway
- Philippines
- Poland
- Portugal
- Russia
- Singapore
- Spain
- Sweden
- Switzerland
- United Kingdom
- United States
Note: Unselecting a region prevents your app from being listed in that region.